
Your Complete Kitchen Renovation Guide: Real Answers from Someone Who's Been There
Your Complete Kitchen Renovation Guide: Real Answers from Someone Who's Been There
Let me guess – you're standing in your kitchen right now, looking around and thinking "this has got to go." Maybe you're dealing with cabinets that look like they were installed when your house was built in 1987, or countertops that have seen better decades. Trust me, I've been exactly where you are, and I'm here to share everything I wish someone had told me before we dove headfirst into our kitchen renovation.
Six months ago, I was scrolling through Instagram, saving every gorgeous kitchen photo I could find, and feeling completely overwhelmed by the thought of actually making it happen. Fast forward to today, and I'm writing this from my dream kitchen – the one I wasn't sure we could actually pull off. But here's the thing: it wasn't magic, and it definitely wasn't luck. It was a lot of research, some smart decisions, a few mistakes we learned from, and finding the right people to help us along the way.
If you've been bombarding me with questions about our renovation (and honestly, I love it), this post is for you. I'm going to walk you through everything – from that very first moment of inspiration to the final reveal, including all the nitty-gritty details about budgets, contractors, and yes, even the occasional meltdown in Home Depot.
Starting with a Vision (Or: How to Turn Pinterest Dreams into Reality)
Remember when you were a kid and you'd cut pictures out of magazines to make collages? That's basically what designing your kitchen feels like, except now we have Pinterest and it's infinitely more addictive.
I started our kitchen cabinet remodel journey the same way most people do – completely overwhelmed and with absolutely no idea where to begin. My husband would find me at 11 PM scrolling through kitchen photos, muttering things like "look at this island" and "why can't our kitchen look like this?" Sound familiar?
Here's what I learned: inspiration is everywhere, but you need a system to capture it and actually use it. I created what became my obsession – a Pinterest board that I creatively named "Dream Kitchen" (I know, super original). But here's the key: I didn't just pin pretty pictures. I started paying attention to what I was consistently drawn to.
After pinning about 200 kitchen photos (yes, really), patterns started emerging. I kept gravitating toward warm, earthy tones instead of the stark white kitchens that seemed to be everywhere. I loved mixed metals – brass faucets with black hardware, vintage-inspired pendant lights with modern cabinet pulls. And I realized I was consistently saving kitchens that felt lived-in and cozy, not like magazine spreads that no one actually cooks in.
Pro tip: Create separate boards for different elements. I had boards for cabinet styles, lighting ideas, backsplash inspiration, and color schemes. It sounds excessive, but when you're talking to contractors or cabinet designers, being able to pull up specific examples makes communication so much easier.
The real game-changer was creating a mood board in Canva. I pulled my favorite elements from all those Pinterest saves and arranged them on one page. Suddenly, I could see if that brass faucet actually worked with the cabinet color I was considering, or if the backsplash tile complemented the countertop samples I'd been collecting.
This mood board became my north star throughout the entire renovation. Whenever we had to make decisions (and trust me, there were approximately 847 decisions to make), I'd pull up this board and ask, "does this fit with our vision?" It saved us from impulse purchases and helped us stay consistent with our design.
The Free Design Hack That Changed Everything
Okay, I'm about to share something that might make some people cringe, but I have no regrets: I totally used free cabinet design services to help plan our layout, even though I knew we probably weren't going to buy cabinets from them. Before you judge me, hear me out.
Professional kitchen design services can cost thousands of dollars, which frankly, we didn't have in our budget. But companies like CliqStudios, Lowes, and even some online cabinet retailers offer free design consultations and 3D renderings to potential customers. I figured, what's the worst that could happen?
I scheduled a virtual consultation with CliqStudios and came prepared. I had our room measurements, photos from every angle, and my mood board ready to share. I was honest about our budget and timeline, and you know what? They were incredibly helpful.
The designer I worked with asked thoughtful questions about how we actually use our kitchen. Do we entertain a lot? Are we serious cooks or more of the takeout-and-reheat type? Do we have kids who need easy access to snacks? These weren't questions I'd thought to ask myself.
Within a week, I had a complete 3D rendering of our kitchen with three different layout options. They showed me things I never would have considered – like how much more storage we could get with taller cabinets, or how a peninsula might work better than an island in our space.
Even though we ended up going with a different cabinet company, this free design session was invaluable. I took those professional drawings to every contractor meeting, and it immediately elevated the conversation. Instead of trying to explain my vision with wild hand gestures and "you know, like, more open but also more storage," I could point to actual plans.
The ethics of this approach: Look, I went into this genuinely considering their cabinets. Their quality was impressive, and their prices were competitive. We ultimately chose a different route because our contractor had a relationship with a local supplier that could offer better value, but I made sure to let the designer know we appreciated their time and would definitely recommend them to others.
Finding a Contractor for Kitchen Remodel: The Make-or-Break Decision
This is where things get real, folks. You can have the most beautiful design in the world, but if you hire the wrong contractor, your dream kitchen can quickly become a nightmare. I'm talking months of delays, cost overruns that make your head spin, and workmanship that makes you want to cry (and not happy tears).
We interviewed five contractors before making our decision, and the differences were staggering. I'm talking about quotes that varied by almost $30,000 for the same scope of work. But here's what I learned: price is important, but it's not everything.
The Thumbtack Advantage
We found most of our potential contractors through Thumbtack, and I'm genuinely impressed with how much more responsive they were compared to the "guy my neighbor recommended" types. Here's why: contractors pay to be on Thumbtack, which means they're actively looking for work and motivated to respond quickly. The neighborhood recommendation guy? He's probably booked solid and may or may not get back to you.
That said, we still asked friends and neighbors for recommendations. Word-of-mouth referrals are gold, especially when you can see the actual work and ask detailed questions about the experience.
Red Flags I Learned to Watch For
- The Yes Man: If a contractor says yes to everything without asking questions or offering alternatives, run. Good contractors have opinions based on experience. They'll tell you when something isn't a good idea, even if it means potentially losing the sale.
- Vague Estimates: If someone gives you a quote that just says "kitchen renovation - $45,000," keep looking. Professional contractors break down costs by category – labor, materials, permits, etc. You should know where every dollar is going.
- No Proper Licensing or Insurance: This should be obvious, but always verify. A legitimate contractor will happily provide proof of licensing and insurance. If they hem and haw about this, move on immediately.
- Pressure to Sign Immediately: Good contractors are busy. They don't need to pressure you into signing a contract on the spot. If someone is pushing you to decide immediately, that's a red flag.
Finding Our Perfect Match
The contractor we ultimately chose was refreshingly honest, sometimes brutally so. When I showed him my Pinterest board and pointed to a gorgeous kitchen with a massive island, he looked at our space and said, "I can build you that island, but you'll have about six inches to walk around it. Is that really how you want to live?"
He questioned some of our choices and offered alternatives I hadn't considered. When I mentioned wanting to move a window, he explained exactly why it would be complicated and expensive, then suggested a different solution that would give us the same result for half the cost.
His quote was detailed down to the square footage of tile and the number of light fixtures. He included line items for things I hadn't even thought about – permit fees, disposal costs for our old cabinets, and a contingency fund for unexpected issues (which, spoiler alert, we definitely needed).
Most importantly, he treated our project like it mattered. He showed up on time for our consultation, returned phone calls promptly, and provided references without being asked. These might seem like basic professional courtesies, but you'd be surprised how many contractors fail at this level.
The Real Talk About Kitchen Cabinet Remodeling Costs
Let's address the elephant in the room: money. Everyone wants to know how much a kitchen renovation costs, but the truth is, it's like asking how much a car costs. Are we talking about a used Honda Civic or a brand-new Tesla? Both are cars, but the price tags are in completely different universes.
For our 12x10 kitchen, we spent $14,000 on cabinets. That might sound like a lot (and trust me, writing that check was painful), but it actually falls in the middle range for our area. We could have spent $8,000 on basic stock cabinets from the big box stores, or $25,000+ for full custom work. We found our sweet spot with semi-custom cabinets that gave us the exact configuration we needed without the custom price tag.
The 5-15% Rule
Here's a guideline that actually makes sense: plan to spend between 5-15% of your home's value on a kitchen renovation, depending on the scope. For a minor refresh – new cabinet doors, countertops, and appliances – stick closer to 5%. For a full gut job like ours (we moved walls, relocated plumbing, and basically started from scratch), you'll be closer to that 15% mark.
This isn't just about budgeting; it's about resale value. If you spend 25% of your home's value on a kitchen, you're probably not going to recoup that investment when you sell. Of course, if you're planning to live there forever and money isn't an object, spend whatever makes you happy. But for most of us, staying within these guidelines makes financial sense.
Breaking Down the Big Expenses
In most kitchen renovations, cabinets and appliances eat up the biggest chunk of your budget. Here's roughly how our costs broke down:
- Cabinets: 35% of total budget
- Labor: 25%
- Appliances: 20%
- Countertops: 10%
- Everything else (backsplash, lighting, hardware, etc.): 10%
The Hidden Costs Nobody Warns You About
- Eating out: When you don't have a functioning kitchen for four months, your restaurant budget explodes. We easily spent an extra $200 a week on takeout and dining out.
- Storage: All those dishes and small appliances have to go somewhere while your kitchen is torn apart. We rented a storage unit for three months.
- Unexpected discoveries: When we removed our old cabinets, we found plumbing that wasn't up to code and electrical work that needed updating. These "surprises" added about $3,000 to our project.
- Permit fees: Depending on your local requirements, permits can cost anywhere from a few hundred to several thousand dollars.
Timeline Reality Check: Patience Is a Virtue (That You'll Need)
If someone tells you your kitchen renovation will take six weeks, laugh politely and then plan for at least double that. We broke ground on June 17th and had a fully functional kitchen by October 20th – that's about 18 weeks for a complete gut renovation.
But here's what that timeline actually looked like:
Weeks 1-2: Demo and Discovery This is the fun part where everything gets ripped out and you feel like you're finally making progress. It's also when you discover all the things that aren't quite right behind those walls.
Weeks 3-6: The Structural Stuff Moving walls, updating electrical and plumbing, installing new windows. This is when your house looks like a construction zone and you start questioning all your life choices.
Weeks 7-10: The Building Begins Drywall goes up, flooring goes in, cabinets arrive. You can finally start to see your vision taking shape.
Weeks 11-14: Installation Marathon Cabinets go in, countertops are templated and installed, appliances are delivered. This is when things start happening quickly.
Weeks 15-18: The Finishing Touches Backsplash installation, final plumbing and electrical connections, hardware installation, paint touch-ups. The details that make all the difference.
The Delays You Should Expect
- Material delays: Our countertops were back-ordered for three weeks. Our custom cabinet doors were delayed by two weeks due to a supplier issue.
- Weather delays: Rain can halt certain types of work, especially if your project involves opening up exterior walls.
- Inspection delays: Depending on your local building department, scheduling inspections can add days or even weeks to your timeline.
- Change orders: When you see your kitchen taking shape, you might decide you want to add something or change something. Each change order adds time.
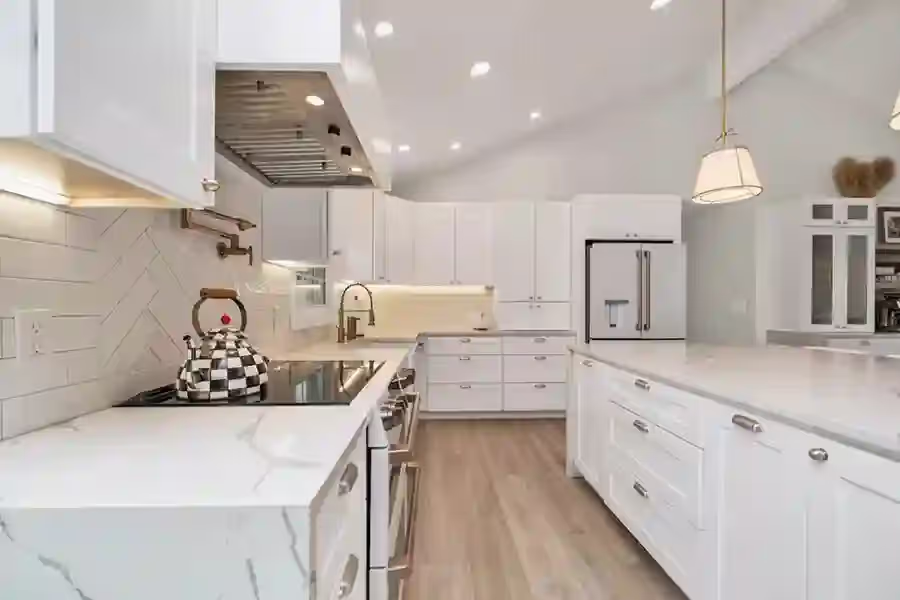
Lighting: The Detail That Makes or Breaks Your Kitchen
I used to think lighting was just about making sure you could see what you were cooking. Boy, was I wrong. Good lighting can make a mediocre kitchen feel amazing, while bad lighting can make even the most expensive renovation feel cheap and uninviting.
Here's the formula that actually works: aim for 35-50 lumens per square foot for general lighting, but don't stop there. Layer different types of lighting to create a space that works for both cooking and living.
Our Lighting Game Plan
We installed five different types of lighting, and each serves a specific purpose:
- Recessed Can Lights (4 fixtures): These are our workhorses. Positioned over work areas, they provide bright, even light for food prep. We chose 3000K LED bulbs with dimmer switches – bright enough for detailed work, but warm enough to feel inviting.
- Pendant Lights Over the Peninsula (2 fixtures): These serve double duty as task lighting for the peninsula and ambient lighting for the whole space. We went with 2700K bulbs for a warmer feel.
- Sconces on Either Side of the Range Hood (2 fixtures): These add symmetry and provide additional task lighting for the cooktop. The 2200K bulbs give off a warm, restaurant-like glow.
- Picture Light Over Open Shelving: This was a last-minute addition that I'm so glad we made. It highlights our dishes and adds visual interest to that wall.
- Flush Mount Over the Window: Sometimes you need light in unexpected places. This fixture ensures the window area doesn't become a dark corner.
The Magic of Dimmers
Every single light in our kitchen is on a dimmer switch, and it's the best decision we made. During the day, everything is bright and functional. In the evening, we dim everything down and the space transforms into something cozy and intimate. It's like having two different kitchens in one.
Flooring: The Foundation of Everything
Choosing kitchen flooring is like choosing a life partner – you're going to be living with this decision for a long time, so it better be good. We went with luxury vinyl plank (LVP) from Coretec, and I have zero regrets.
I know what you're thinking: "Vinyl? Really?" But hear me out. Modern LVP looks incredibly realistic – our guests consistently think our floors are real hardwood. But unlike hardwood, LVP is 100% waterproof, which means no worrying about spills or moisture damage. It's also incredibly durable and easy to maintain.
We extended the same flooring throughout our entire first floor, which creates a seamless flow and makes the space feel larger. The installation was quick and relatively inexpensive compared to other options.
Why LVP Beat Out the Competition
- Hardwood: Gorgeous but not waterproof and requires regular maintenance
- Tile: Durable and waterproof but cold underfoot and grout maintenance is a pain
- Laminate: Affordable but not waterproof and can look cheap
- Natural stone: Beautiful but expensive, requires sealing, and can be slippery when wet
LVP gave us the best of all worlds: the look of hardwood, the durability of tile, and a price point that didn't break our budget.
Cabinet Deep Dive: The Heart of Any Kitchen Cabinet Remodel
Let's talk about the stars of the show: the cabinets. This is where you'll probably spend the biggest chunk of your budget, so it's worth understanding your options.
We went with Kitchen Cabinet Distributors (KCD) based on our contractor's recommendation, and they've exceeded our expectations. The soft-close hinges and drawer slides are luxurious details that make the kitchen feel high-end. The dovetail construction and plywood carcasses mean these cabinets are built to last.
Construction Quality Matters
Here's what to look for in kitchen cabinet remodeling:
- Box construction: Plywood is superior to particleboard. It's stronger, more moisture-resistant, and holds screws better.
- Door construction: Solid wood doors will last longer than veneer over MDF, but they're also more expensive.
- Hardware: Soft-close hinges and drawer slides aren't just nice to have – they extend the life of your cabinets by preventing slamming.
- Finish: Look for catalyzed conversion varnish or lacquer finishes that can withstand daily use and cleaning.
The Three Cabinet Categories
- Stock Cabinets: Pre-made in standard sizes, available at big box stores. Least expensive but limited customization options.
- Semi-Custom Cabinets: Made to order in a wider range of sizes and styles. This is where we landed – more flexibility than stock, but more affordable than custom.
- Custom Cabinets: Built specifically for your space. Most expensive but unlimited design possibilities.
Storage Solutions That Actually Work
The best part about upgrading our cabinets wasn't just how they looked – it was how much better they functioned. We added:
- Pull-out shelves: No more crawling into base cabinets to reach items in the back
- Soft-close drawers: Everything closes smoothly and quietly
- Appliance garage: Keeps small appliances accessible but hidden
- Vertical dividers: Perfect for storing baking sheets and cutting boards
- Deep drawers: Much more functional than traditional shelves for pots and pans
The Sink and Plumbing: Where Function Meets Style
We sourced our sink, faucet, and pot filler from Vintage Tub and Bath, and they've been fantastic. I was initially worried about choosing a white porcelain farmhouse sink – everyone warned me about staining and chipping. But four months in, it still looks brand new.
The secret is using a gentle daily cleaner and addressing spills quickly. Even red wine that sat overnight cleaned up easily with a bit of soft scrub. The depth of the sink is perfect for washing large pots, and the farmhouse style gives our kitchen that vintage charm we were after.
Pot Filler: Luxury or Necessity?
The pot filler was one of those "do we really need this?" purchases, but it's become one of my favorite features. If you do a lot of cooking (especially pasta or large batch cooking), having a water source right at the stove is incredibly convenient. Plus, it adds a professional, chef-like feel to the space.
Saving Smart: How We Funded Our Dream Kitchen
Let's be honest about money because kitchen renovations are expensive, and pretending otherwise doesn't help anyone. We saved for our renovation for over a year, and we were strategic about it.
Our Savings Strategy
We set a goal to save our estimated renovation cost plus 20% for unexpected expenses (which we definitely needed). Here's how we made it happen:
- Automatic transfers: Every payday, $500 automatically moved to our renovation savings account before we could spend it.
- High-yield savings: We kept our renovation fund in a high-yield savings account earning 4.34% interest. Every little bit helps.
- Bonus money: Any work bonuses, tax refunds, or unexpected windfalls went straight to the renovation fund.
- Temporary lifestyle adjustments: We cut back on dining out, postponed a vacation, and generally lived more frugally for about a year.
Financing Options We Considered
- HELOC (Home Equity Line of Credit): This wasn't an option for us since we'd only been in our home for a year, but it's a popular choice for major renovations.
- Personal loan: Higher interest rates than a HELOC but faster approval process.
- Cash: Our choice. More conservative but no debt or interest payments.
- Credit cards: We used 0% promotional rates for some appliance purchases but paid them off before the promotional period ended.
The 20% Buffer Rule
I cannot stress this enough: save more than you think you need. We budgeted an extra 20% for unexpected costs, and we used every penny of it. Hidden plumbing issues, electrical updates, and material delays all cost extra money. Having that buffer meant we could address problems without panic or debt.
Permits and Regulations: The Not-Fun but Necessary Stuff
Yes, we needed permits. Any time you're moving electrical, plumbing, or structural elements, you'll likely need permits. Our contractor handled all of this, which was worth every penny of the fees he charged.
In our area, we needed permits for:
- Electrical work (new outlets and lighting)
- Moving the window
- Structural changes (removing a wall)
The permit process added about two weeks to our timeline and $800 to our budget, but it's not optional. Unpermitted work can cause major headaches when you try to sell your home.
Living Through the Chaos: Survival Tips
Four months without a kitchen tests your patience, your marriage, and your creativity. Here are the strategies that saved our sanity:
The Temporary Kitchen Setup
We set up a makeshift kitchen in our dining room with:
- A mini fridge for essentials
- A microwave for reheating
- An electric kettle for hot water
- Paper plates and disposable utensils
- A cooler for extra cold storage
Meal Planning Strategies
- Embrace takeout: Budget for it because you'll need it
- One-pot camping meals: If you have access to a grill or camp stove
- Meal prep: Prepare large batches when visiting friends' kitchens
- Sandwiches and salads: Simple meals that don't require cooking
Relationship Survival
Living in a construction zone is stressful. We learned to:
- Take breaks from the house when possible
- Make decisions together but designate point people for different aspects
- Celebrate small milestones along the way
- Remember that the chaos is temporary
The Final Result: Was It Worth It?
Sitting here in our completed kitchen, writing this while dinner simmers on the stove, I can honestly say it was worth every stressful moment. Our kitchen went from a cramped, dysfunctional space to the heart of our home.
But the real test isn't how it looks – it's how it functions. We actually cook more now because the space is so pleasant to work in. We entertain more because we're not embarrassed by our kitchen. And every morning when I make coffee, I still get a little thrill from how beautiful and functional everything is.
What I'd Do Differently
- Start the permit process earlier: This could have saved us a week or two
- Order materials with longer lead times first: Some of our delays could have been avoided with better planning
- Take more before photos: I wish I had better documentation of the original space
- Plan for storage during renovation: We should have figured this out before demo started
What Exceeded Our Expectations
- The impact of good lighting: It completely transformed how the space feels
- How much we'd use the peninsula: It's become our favorite spot for casual meals
- The difference quality hardware makes: Soft-close everything is pure luxury
- How much more storage we gained: Thoughtful cabinet design doubled our storage capacity
Your Turn: Making It Happen
If you're still with me, you're probably serious about this kitchen renovation thing. Here's my advice for getting started:
- Start with inspiration but ground it in reality: Pinterest is great for ideas, but make sure they work for your space and budget.
- Take advantage of free design services: Even if you don't buy from them, the insights are valuable.
- Interview multiple contractors: The difference between a good and bad contractor can make or break your project.
- Save more than you think you need: Unexpected costs are not a matter of if, but when.
- Plan for the inconvenience: Living without a kitchen is harder than you think.
- Focus on function first, then beauty: A gorgeous kitchen that doesn't work well will frustrate you every day.
- Don't try to do everything at once: If budget is tight, prioritize the big-ticket items and add finishing touches later.
The most important thing I learned through this process is that a successful kitchen renovation isn't about having an unlimited budget or perfect design skills. It's about careful planning, realistic expectations, and finding the right people to help you bring your vision to life.
Your dream kitchen is possible. It might take longer than you want and cost more than you hope, but when you're standing in your new space for the first time, flipping on those perfect pendant lights and running your hand along those smooth countertops, you'll understand why people say it's worth it.
Take it from someone who survived the chaos and came out the other side with a kitchen that still makes me smile every day – you can do this too.
Now, if you'll excuse me, I have some dinner to finish preparing in my beautiful, functional, absolutely-worth-every-stressful-moment kitchen. And yes, I'm still a little bit in love with it every single day.